
Sunday, February 6, 2011
Make Your Own Bunting Stationary

Wednesday, October 20, 2010
Book Binding
For my one year wedding anniversary gift for my husband I wanted to do something in the vein of the traditional first gift: paper. So, I called in the big guns. One of my good friends got her masters in book binding and she was kind enough to teach me how to make a book.
We started by cutting thick pieces of cardboard for
the front and back covers and the spine.
Next, I cut a pieces of paper to wrap around all three pieces.
Using her glue, mixed with water, and a brush,
I cut a strip of thick white paper to give the spine some strength,
then added a brown sheet of paper over the top of that.
I ripped four sets of signatures of paper for the inside.
Each signature is made up of four pieces of paper
cut to the same size and folded over.
I tore the paper, using a ruler, to give the edges a rougher look.
Using an awl I puntured the spine with four holes in a row in three different spots.
The finished spine had a crisp look. The finished book (shown at the top) turned out beautifully. This is a very simple outline of a complicated process and there's no way mine would have turned out well without my friend's help.
When it was complete I filled the first few pages with some of my favorite memories from our first year of marriage. I'm planning to add to it each year.
Photos by moi.
Thursday, September 16, 2010
DIY : Citronella Candle
Sunday, September 12, 2010
DIY: Mirror
Flannel Man and I returned from vacation to find our half bath mirror cracked and broken. Money is a bit tight right now and I was looking for a way to solve the problem without depleting our funds. I found this gold mirror at Goodwill for $6 and saw nothing but potential. I bought a small can of silver spray paint at Michaels. It was on sale for $2.
I covered the mirror with saran wrap and shoved pieces of paper underneath the outer frame to protect the mirror. I took it outside, laid paper towels beneath it and then sprayed every inch of it.
The completed mirror, hanging in the bathroom, is exactly what we needed. It's not perfect, but for $8 it works great for us!
Photos by moi.
Tuesday, September 7, 2010
DIY Lamp

Here's a great DIY project created by a friend of A Tale of Two Bloggers. This lamp, which originally had a wood and gold metal base, cost only 50 cents at a garage sale.
Learning how to turn it into a beautiful new piece took only a bit of internet research. She used spray paint to cover the unattractive parts. The first layer was a primer, then a black coat, a clear top coat and finally a bit of silver chrome spray paint for the metal.
The shade was 50% off at Target, which was the final touch needed for the project. The final product looks like something I would buy new for $40. It just shows you that you have to sometimes look a bit deeper to see an item's potential.
Wednesday, August 4, 2010
Guest Post: Photography Tips
Shoot like a Pro!
Quick and easy tips for beginning a happy life with your SLR camera
Today's post comes from the talented photographer Laurel Hasner of Laurel Hasner Lifestyle Photography. Laurel has been shooting family portraits, weddings, baby pictures and more for the past decade. Today she shares a few tips to help you improve your photography skills.
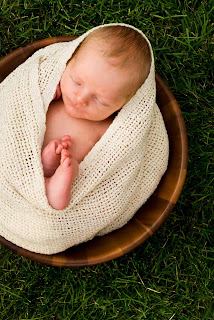
I love taking pictures. So... I chose to become a photographer, and now I get to do what I love every day! What I've realized though, is that nearly everyone likes taking pictures! And it is easier than you might think. I am always encountering people with questions, who could be taking jaw-dropping images, but are holding back because they don't know where to begin. Many people already have a great camera, and simply want to take stellar shots of their kids, they simply lack the know-how. So here are a few pointers from a newborn shoot I had yesterday evening.
I wanted to get away from my trusty friend The Flash (Speedlight SB-600), and enjoy this summer's natural dusk light as much as possible. I always scout out the location before the shoot, or if it is at the client's home, I search the house and yard for good lighting and possible "sets". Always pay attention to the background! Keep it simple and look for texture. In this case, the competing textures of blanket, wood and grass happen to play together nicely to create a natural, touchable feel. (The baby makes it even better!)
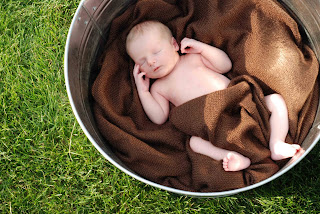
The sun was setting and we were set up in direct, yellow light, so for the picture with the wooden bowl, I set up the metal tub on the ground between the baby and the sunlight. It gave us the shade I needed to get a smooth, overcast lighting effect with no hot spots. You can see the "hot spots" of sunlight in the picture with the little guy in the metal tub.
One of the first things I do is a white balance test to make sure it's dead on. Without that, you may be disappointed in the overall color cast of your final image. There are white balance settings on any SLR (Single Lens Reflex) camera, but they aren't always accurate enough. I use a little contraption called an Expo Disc. It is a flat circular disc on a lanyard that you can hold up to the lens, point at your light source (sky, window, soft box) press the shutter, and it will calculate your white balance for you. It's very handy. No more white or gray cards!
Without the Expo Disc however, my advice is to break out your camera's manual for this one! I know. Nobody wants to read the manual. But the test is quick and easy and accurate for every lighting situation, and you paid money for a good camera, so start with this! :) Another option, especially helpful if you've just recently welcomed this intimidating camera into your home, is to purchase a Magic Lantern DVD Guide of your specific camera. It's like camera manual Cliff's Notes in movie form. Super!
Want to take a picture worthy of a 16 X 20" space on your wall? Turn the ISO (film speed) down to 250 or under. A lower ISO means less "noise" in your picture.
The third main, defining variable is shutter speed, which controls the amount of time the sensor is exposed to light. Crank it up to capture the split second mid-air athelete at a sporting event, and bring it back down for low light or a waterfall. Simple, right?
I use a Nikon D80 with a 50mm prime (or "fixed") lens. Prime just means that it is not a zoom lens. Fixed lenses are better quality. If I want to "zoom" I have to move my feet in closer! :) The 50mm. is a wonderful portrait lens, capable of capturing your subject's eyes or face, and blurring everything else. Yet, you can also use it to take a distant landscape in, and get a good range of clarity. The 50mm is very versatile, and not that expensive. I have used it on every shoot without fail!
Post Production: Where the real fun comes in...
I use Photoshop CS4, but you can do basic touch-ups with any photo-editing software. The main functions I use are exposure, black and white levels (or "curves"), contrast, vibrance, clarity, temperature and lens vignetting. It's mostly just fun to see what a digital darkroom is capable of, but save yourself time in this area and just take a good picture to begin with!
Grab your camera, head outdoors, experiment, and remember, photography is supposed to be FUN for both the photographer and the subject! Don't get too caught up in the mechanics of it all! Thanks for reading today! Happy picture taking!
Photos and tips courtesy of Laurel Hasner Lifestyle Photography
Wednesday, May 12, 2010
Wedding DIY: Embroidery
This is the first in a series of posts on Wedding DIY. These do-it-yourself projects are all things I decided to create for my own wedding in October 2009.
This particular project was to embroider two handkerchiefs with a special message. One was a note to my husband-to-be (Flannel Man) and the other was for my Dad. Having never embroidered anything before I wasn't completely sure where to start. I decided to get a starter embroidery kit and chose this one, which I found on sale somewhere.
I purchased the yarn and handkerchiefs I wanted and decided what I wanted to embroider. I wrote out a message to Flannel Man and used a quote about family for my Dad's. After reading the kit's manual I wrote the quotes on the handkerchiefs lightly with a pencil to make sure they would fit. I kept the letters in a block form to make it easier. Then I popped in a movie and started to stitch.
I gave both handkerchiefs to the guys during the rehearsal dinner and they carried them in their pockets on my wedding day. The end product was nothing perfect, but they were definitely readable and the guys seemed to appreciate them. I loved knowing that Flannel Man had that special note from me in his pocket that no one else knew about.
If you have a friend or family member who is getting married, you could always offer to do or at least help them with a DIY project of their choosing. The same is true for bridal showers, baby showers, bachelorette parties, birthday parties, etc. I love seeing the tiny details that others have taken time to create that make events unique.
I'd like to add that for your own wedding, you shouldn't take on any more DIY projects than you can handle. These projects should be fun, not stressful. I loved doing them because it was an excuse to learn something new and challenge myself. When you're planning a wedding you don't need to add more things to your to do list. So only take on things that are important to you. In the end the crucial thing is to be able to relax and enjoy the day.
Tuesday, March 2, 2010
Personal Cards
There's nothing better than finding real mail or an unexpected package in your mailbox. I'm a serious advocate for keeping the art of writing letters alive and well. Recently I decide the only thing that I would like more than getting a letter from a friend, would be getting one made with a photo of some great memory we shared.
So out came the paper cutter, some card stock and a glue stick. I had fun just making the cards. They reminded me of a picnic in Germany, a local concert, a garden in Zurich, rocking a mini-marathon, a rocky beach in France, getting a bottle of wine in Prague and then realizing we had no corkscrew, all good times.
Friday, February 26, 2010
DIY: Record Bowls
I love finding ways to make old things useful in a new way (which is one of the reasons I love Real Simple so much). One of my favorite examples of this is record bowls. You can find cheap records at Goodwill and after that all you need is an oven and a bowl.
You can find a step-by-step tutorial here.
When making the bowls I often shape them multiple times. If I don't like the first shape I come up with I just put it back in the oven and try again. It cools into a solid shape quickly, so you have to work fast.
These bowls make great gifts for music lovers. In the past I've searched high and low to find records by people's favorite artists in order to make the gift more personal.
Photos by moi.
Thursday, February 25, 2010
A Homemade Thank You Card
- The first step is to make sure that you have an editing program or two, on your computer. I use Picasa through Google and Photoscape. They are both free and user friendly.
- Then, grab your subjects. My participants were more than willing to stay perfectly still for the shoot, which included quite a few "do overs". We had fun with it. I would let them see each letter after they finished and oooh and ahhhh over it. ( This could have also been used as a wonderful teaching tool. Making your body into the different letters of the alphabet, printing and having them spell different words. )Don't worry about it being perfect just have them contort and get creative with the lettering! Spell your word out one letter at a time. I did this by having them lay on the floor while I was standing on our bed looking down.
- Upload your "people letters" onto the computer and then open up Picasa. They have an option on the toolbar that says "Create" and then go down to "Picture Collage".
- Take each individual "letter" photo and put it into the program's collage. Play with the spacing and other options till you get it how you like it and then SAVE.
- Once it is saved. I exported the now "Thank You" grouped lettering out of Picasa, and into Photoscape. Once in Photoscape, click on Editing. Find your saved picture that you exported out of Picasa, then start editing. I made this one black and white so you couldn't see how all over the carpet they were, and how the lighting was always different. Made a black border around the photo. And added individual letters to each of the "people letter" panels. Viola! It was done! Almost....
- Finding a deal on Seehere.com and getting shipping free. I made them into Photocards and wrote "Thank You" at the bottom.
A classic project that will involve the kids in the thanking process and make for a fun afternoon! :)
Monday, February 22, 2010
Magazine Holders
Friday, February 12, 2010
Happy Valentine's Day!
I'm not a big fan of the color pink or cheesy greeting cards or many other things associated with Valentine's Day (though I do like chocolate), but I am a fan of showing the people I love that I appreciate them.
So in an effort to do just that I got out the pink construction paper and a very outdated New York travel guide and started cutting. Using a little bit of ribbon, a glue stick and a few paper hearts, I made cards for a few close friends.
Thursday, January 7, 2010
DIY: Emergency Car Kit
As those of us in the Midwest know, the roads get bad in the winter. You don't want to be stuck on the side of the road, in freezing weather, completely unprepared.
So as a Christmas present for Flannel Man I made an emergency car kit. I actually made one for myself too.
I used one of the many milk crates I already had (I pick them up at yard sales whenever I see them) and filled it with a few items that would be helpful to have in a pinch.
The kit includes...
-Plastic gas can
-Paper towels
-Kitty Litter in a tupperware container
-A bungee cord
-A blanket
-A sweatshirt
-Granola bars
-Duct tape
Most of the items are self-explainatory. The duct tape and bungee cord can be used as a short term fix for a minor accident.
The kitty litter is used to provide traction when you are stuck in an icy ditch. Just pour some kitty litter under your wheels to prevent them from spinning on the icy.
The blanket and sweatshirt are to provide warmth if you're stuck on your own for awhile. To save on space, tightly roll them together and wrap the bungee cord around them.
Add any other items that you think would be beneficial in a tight spot. A flashlight or head lamp would be a good idea. Also, make sure you have a set of jumper cables in your car.
In my kit I have a car jump starter. It's a one time use item that charges your battery via your cigarette lighter. I would only use this if I was in the middle of nowhere and couldn't get another person to jump my car.
I also added a book to mine, because if I'm stuck on the side of the road I know that's what I'm really going to want.
Photos by moi.
Wednesday, December 23, 2009
DIY: Christmas Ornaments
Monday, December 21, 2009
DIY: Doily Luminaries
I originally got the idea to make these Doily Luminary bags from Martha Stewart. My best friend and I made them for my wedding, but it ended up being too light outside to see them well. So I saved them and now, a few months later, they were perfect for lining the path to our house for a holiday house warming party.
We started with simple white luminary bags and paper doilies. You can get those at any craft store. Then we tried to use a hot glue gun, but that wasn't working so well, so we ended up using double-sided tape.
By the time we had made about 10 bags we were getting a little creative. We cut the doilies in half or fourths and used just the edges to line the bags. We also tried cutting patterns and initials into the doilies before taping them in.
When finished the bags create a lacy effect that looks great. You can use regular tea lights or the flameless kind, though the real ones have a better glow.
Fill the bottom of the bags with about 2 cups of sand or kitty litter. I used kitty litter so when I was done with it I could pour it into two containers which Flannel Man and I can put in our trunks. Kitty litter is perfect for emergency car kits because it can be used to create traction if you are stuck in an icy rut.
Photos by moi.
Wednesday, December 16, 2009
DIY: Cork Tags
I hosted my very first Christmas party last weekend. For the appetizers we were serving I made little tags to explain what each one was.
I used wine corks and pennies to create them. I cut half way down the cork (lengthwise) and then hot glued the cork to a penny.
Then I made tags using old Christmas gift tags and pieces of scrapbook paper. It was cheap (I didn’t have to buy anything) and easy.
Photos by moi.


