Saturday, March 26, 2011

Random Acts of Kindness


How often do you do something and expect nothing in return? I know that I rarely think of doing things that are completely selfless. This weekend we (two bloggers) will be going around town doing random acts of kindness for as many people as we can.


In the next couple weeks we'll post about all the fun things we did and hopefully that will inspire you to do something nice for someone you've never met. We filled a small booklet of 3 X 5 cards with notes for people, which we will leave at each thing we do.


Each note has the following verse and a short, anonymous note...


"Each one should use whatever gift he has received to serve others, faithfully administering God's grace in its various forms." I Peter 4:10


Sunday, February 13, 2011

What's Cooking: Kale Chips


Until a week ago I'd never heard of Kale. It's a lettuce type vegetable that's apparently really good for you. The recent issue of Real Simple suggests making Kale Chips with it and I tried it out.


After washing the kale, rip off the main stalk and rip it into little bunches. Then toss it in a bowl with olive oil, salt and pepper. Put the pieces on a baking sheet and cook at 300 degrees for about 25 minutes.

(the finished chips)

The final product are crispy little ugly leaves, but they taste almost exactly like potato chips! I don't know if I would have believed it if I hadn't made them myself, but they really do. The after taste is a bit odd, but not bad and much healthier.

Photos by moi.

Sunday, February 6, 2011

Make Your Own Bunting Stationary


It seems like we get loads of junk mail. No matter how many paperless bills I sign up for, it still comes streaming in. So here's a great way to put those security envelopes to good use.

When you receive one with a pattern on the inside, save it. Once you have a few different patterns, cut small triangles out of the pattern. Then take some blank stationary (I cut my own out of card stock) and make a diagonal line with a sharpie in any color you choose.


Use a glue stick and glue the various patterned flags across the card, along the line. The finished cards look like bunting is strung across them and they're perfect little blank cards.

Photos by moi.

Saturday, January 29, 2011

How To Poach An Egg


I finally learned how to poach an egg. I followed a step-by-step tutorial from Smitten Kitchen. I dropped the egg into a whirling pot of water and (after a few tries) I had a poached egg! The instructions are brilliant and include pictures. If you've ever been afraid to try it, I was, this is the time.

Photo by moi.

Friday, January 21, 2011

TV Wall Decoration


I'm not sure how to decorate the open space about a TV. In theory, you'll be looking at the TV when you look at that wall, so you don't want a busy piece of art or something above it. There was a small white shelf on the wall when you moved in (as seen above) and we decided to put a few open cubes up to add a little something. I would love to get a flat panel TV stand and a flat screen TV to open up some space, but that's not currently in the budget.


Instead we added these cubes, which hold some fun items. The jar of sand is from our sand ceremony in our wedding and the wooden heart was a souvenir from a trip I took to Austria.


In the above picture you can see how it looks now. I'm curious what other people put above their TVs.


Photos by moi.

Wednesday, December 15, 2010

Bathroom Cabinet Organization


Sometimes the simple things in life can be the most frustrating things. Like opening your bathroom cabinet every morning and having stuff fall out or never being about to find what you're looking for.

When the problem is simple, the solution usually is to. I found an OXO Good Grips organizer set on amazon and I knew it would be perfect.


The best part is that both pieces (the holder cup and dividing shelf) have a rubber-like substance on their bases. This means when I clumsily reach for something it won't easily knocked over. Just one more thing to make my life a little easier.


Photos by moi.

Monday, December 6, 2010

What's Cooking: Tomato and Meatball Soup


I finally got a chance to make something in my dutch oven! I found a recipe for Tomato and Meatball soup and tried it out. It was delicious! This one will definitely become a winter staple at our house.


I made the meatball mixture from scratch and was skeptical about how it would turn out. I's never cooked raw meatballs in a soup, but it worked!


Here's the complete recipe and directions from the wonderful Hip Hostess...

Tomato and Meatball Soup

Serves 6 to 8


Meatballs

2 slices of white sandwich bread, torn into large pieces**

1/2 cup skim milk

1/2 cup grated Parmesan cheese

4 cloves of garlic, minced

2 tsp fresh thyme, minced

1 large egg, slightly beaten

3/4 tsp kosher salt

1/2 tsp pepper

1 lb extra lean ground beef


Soup

8 oz whole wheat rotini pasta

2 Tbsp olive oil

2 carrots, small diced

1 onion, minced

2 Tbsp tomato paste

4 garlic cloves, minced

1 tsp fresh thyme, minced

1/2 tsp dried oregano

3/4 tsp salt

1/2 tsp pepper

2 (28 oz) cans diced tomatoes in puree

4 cups low sodium chicken stock

grated Parmesan

julienned basil


Meatballs

Line a baking sheet with aluminum foil. In a large bowl, place the milk and bread and allow to soak for a minute or two. Using a fork whisk the two ingredients to combine. Stir in the parm, garlic, thyme, egg, salt, and pepper. Add the meat and mix together with a fork to keep the mixture light and not dense. Wet your hands and roll 1-inch meatballs, placing them on the baking sheet. You should have 30 - 35meatballs.


Soup

Cook the pasta according to package directions. Rinse with cool water and set aside.


In the meantime, heat the oil in a large dutch oven over medium heat until shimmering. Add the carrots and cook for 2 minutes. Add the onion and cook an additional 5 - 7 minutes until translucent but not brown. Stir in the tomato paste, garlic, thyme, oregano, salt and pepper. Cook for 30 seconds until garlic becomes very fragrant. Stir in the tomatoes and stock. Add the meatballs without stirring, and bring the temperature up to a simmer. Cook until meatballs are tender but cooked through, about 15 minutes. Add the pasta to the soup and season with salt & pepper to taste.


Serve each bowl with a sprinkle of Parmesan and julienned basil on top.


After Flannel Man and I each had a big bowl we still had plenty left to freeze for another night. It was the perfect hearty meal for a cold night.

Photos by moi.

Monday, November 29, 2010

What's Cooking: A Whole Chicken


I made a whole chicken in a crock pot. Woo hoo! It's like the simplest thing ever, but it was still pretty intimidating... it's a whole chicken.


All I had to do was rinse off the chicken and sprinkle paprika and minced garlic on top. Then I cooked it 7 hours on low. When I got home form work it was hot and ready. The meat was literally falling off the bone.


Here's a great how-to that I followed at The Happy Housewife.


We ended up with a ton of meat that made for a wonderful dinner and lots of leftovers. It also taught me not to be scared of cooking things that seem "big."

Photos by moi.

Monday, November 22, 2010

What's Cooking: Parchment-Baked Halibut


So here's a post just for the halibut... sorry. Anyway, I made halibut for the first time and I wasn't impressed. It was expensive and not fantastic compared to salmon or other basic fish. It was simple to cook though.

You place the halibut steak (yeah, I didn't know it was called that either) inside a piece of parchment paper. You fold it over and create a little pocket for each one. Put slices of orange into each pocket and cook for 12 minutes at 400 degrees.


Photos by moi.

Monday, November 15, 2010

One Year Anniversary


In October Flannel Man and I celebrated our one year anniversary. We enjoyed a bottle of wine we bought in Napa Valley and we broke out the frozen top tier of our wedding cake. It's been a great first year and I'm blessed to have him in my life.


The cake was actually surprisingly good. We kept it in a plastic ice cream container in the fridge and it some how kept really well.

Photos by moi.

Thursday, November 11, 2010

What's Cooking: Pasta With Bacon and Cauliflower


This recipe was really delicious, but it's super rich. I've never used pecorino in a recipe before. Actually I didn't know what it was before this (it's a type of cheese). It has a really distinct taste that was wonderful with the cauliflower.


The recipe is from Real Simple ...


Ingredients

• 12 ounces spaghetti (3/4 box)

• 6 slices bacon

• 1/3 cup fresh sage leaves

• 1 small head cauliflower (about 1 1/2 pounds), cut into small florets

• salt and black pepper

• 3/4 cup grated pecorino (3 ounces)


Directions

1. Cook the pasta according to the package directions. Drain, reserving ¾ cup of the cooking water, and return the pasta to the pot.


2. Meanwhile, cook the bacon in a large skillet over medium-high heat until crisp, 6 to 8 minutes. Transfer to a paper towel-lined plate and crumble.


3. Add the sage to the drippings in the skillet and cook over medium heat, turning once, until crisp, 1 to 2 minutes. Transfer to the plate with the bacon.


4. Add the cauliflower, ¼ cup water, and ¼ teaspoon each salt and pepper to the drippings in the skillet and cook, covered, for 2 minutes.


5. Uncover and cook, tossing frequently, until golden and tender, 3 to 4 minutes more.


6. Add the reserved pasta water and ½ cup pecorino to the pasta; toss until creamy. Add the cauliflower, sage, and bacon and toss. Sprinkle with remaining pecorino.


Photos by moi

Tuesday, November 9, 2010

Make Do or Do Without


At what age are you officially suppose to grow up and get real furniture? I’ve been wondering about that lately when I look at our mismatched dining chairs and hand-me-down green table. Don’t get me wrong, I love these pieces, but I’m wondering how long it’s acceptable to scavenge for chairs when we have guests over. Last time we had a dinner party we used a bench as supplemental seating.


We have bookcases from rummage sales, dressers from friends who moved cross-country, etc. The only furniture we have bought at a store is our bed and a couch. Both of those items were from massive sales at Value City furniture and we saved up for awhile before getting them.


Flannel Man and I tend to go off the assumption that if we can’t get it at a yard sale or buy it used from friends and family, then we probably don’t need it. Once we have a bigger family we’ll probably invest in a table with matching chairs (and by invest I mean find it on Craig’s List), but until then I’ll stick with the old saying “use it up, wear it out, make do or do without.”


Photo by moi.


Wednesday, October 20, 2010

Book Binding

For my one year wedding anniversary gift for my husband I wanted to do something in the vein of the traditional first gift: paper. So, I called in the big guns. One of my good friends got her masters in book binding and she was kind enough to teach me how to make a book.


We started by cutting thick pieces of cardboard for

the front and back covers and the spine.


Next, I cut a pieces of paper to wrap around all three pieces.

I cut off the corners so that the whole thing would have fewer creases.
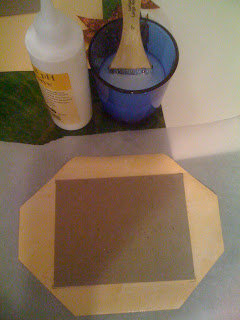

Using her glue, mixed with water, and a brush,
I glued the paper around each of the cardboard pieces.
Then I picked out a large sheet of marbled
paper to add a second layer to the book.

I cut a strip of thick white paper to give the spine some strength,

then added a brown sheet of paper over the top of that.


This is how the covers and spine look before the paper is added to the inside.

I ripped four sets of signatures of paper for the inside.

Each signature is made up of four pieces of paper

cut to the same size and folded over.

I tore the paper, using a ruler, to give the edges a rougher look.

Using an awl I puntured the spine with four holes in a row in three different spots.

Then I stitched each of the signatures into the book,
looping through the spine twice for each one.


The finished spine had a crisp look. The finished book (shown at the top) turned out beautifully. This is a very simple outline of a complicated process and there's no way mine would have turned out well without my friend's help.

When it was complete I filled the first few pages with some of my favorite memories from our first year of marriage. I'm planning to add to it each year.


Photos by moi.

Thursday, September 30, 2010

What's Cooking: Red Potato Casserole


INGREDIENTS:


-1/2 cup Light Ranch Dressing

-1/2 cup Shredded Cheddar Cheese

-1/4 cup Real Bacon Bits

-2 lb. small red potatoes, quartered

-1 Tbsp. chopped fresh parsley


DIRECTIONS:


HEAT oven to 350°F.


1) Mix first 3 ingredients in large bowl. Add potatoes; toss to coat.


2) Spoon into 13x9-inch baking dish sprayed with cooking spray; cover.


3) Bake 55 min. or until potatoes are tender, uncovering after 40 min. Sprinkle with parsley.


***I cooked them for closer to 2 hours.


This recipe was delicious, but it took twice the time listed to cook. I also screwed up, because I forgot to quarter the potatoes before I coated them in the cheese and dressing. So cutting them up was much more difficult than it needed to be. They were great warmed up even 5 days later. So if you made the casserole at the beginning of the week you could use it as a side a couple times.

Photos by moi.


Monday, September 27, 2010

What's Cooking: Orange Julius


For Monday night football games, Flannel Man's family used to make a pitcher of Orange Julius and a big bowl of popcorn. I, on the other hand, had never had an orange julius. So we got out our blender and whipped up the delicious drink using this recipe...

INGREDIENTS:


6 oz. frozen orange juice concentrate
1 cup milk
1 cup water
1/4 cup regular sugar

1/4 powdered sugar

1 tsp. vanilla extract
8-9 ice cubes


DIRECTIONS:

1. Combine all ingredients except ice cubes in blender.


2. Blend for about 1-2 minutes, adding ice cubes one at a time.


We poured the drinks into fancy martini glasses and sipped away. On a side note, adding a splash of rum is wonderful too!


Photos by moi.

Friday, September 24, 2010

What's Cooking: Baked Acorn Squash


My sister gave me some yellow acorn squash the other day and I had no idea how to cook it. So yay for google and millions of recipes at your fingertips. Here's the one I used...

BAKED ACORN SQUASH

Yield: 4 servings.


2 med. acorn squash

2 to 4 tbsp. butter

Salt

2 to 4 tbsp. brown sugar


1. Wash the acorn squash well and cut in half, lengthwise.


2. Remove seeds.


3. Place the half squash cut side down in pan. Pour boiling water to 1/4 inch depth. Bake at 400 degrees for about 30 minutes. Turn cut-side up; sprinkle with butter, salt and brown sugar. Bake at 400 degrees for 30 minutes or until tender.


I laid the halved squash in the pan and after 30 minutes in the oven I turned it and added the rest of the ingredients.


The butter and brown sugar melted beautifully. After a total of 1 hour in the oven, the squash was very tender. The hardest part was scrapping it out of the shell without burning myself or ripping the shell apart.


It created a mashed potato-like mush that tasted pretty good. In the end I'd say I'm glad I tried it, but it was way too much work for something we didn't absolutely love.

Photos by moi.

Monday, September 20, 2010

What's Cooking: King Crab Legs


We decided to try cooking Alaskan king crab legs for the first time this week. It was so much simpler than I expected. When you buy the legs they are already fully cooked. All you have to do is thaw them and then follow these directions...


To bake crab legs

1. Preheat the oven to 350°F (180°C).

2. Crack the whole crab legs and place them on a baking tray.

3. Brush the crab legs with butter or oil, seasoning and lemon juice and bake in the oven for 8 - 9 minutes.


We also made a dipping sauce for them using this recipe...


Butter Sauce: 1/2 cup unsalted melted butter, 1-tablespoon lemon juice, 3/4 teaspoon garlic salt and 1/2 teaspoon dried dill weed.


We each had two legs and along with some broccoli and french bread, it was a very full meal. It turned out perfectly and was less expensive than I expected. The 4 legs cost $18, which is too much for a weekly meal, but just right for a special treat.


During the same weekend I attended an art fair and found a gorgeous pottery piece that I knew would be a great addition to our kitchen. We used it for the first time to serve the bread. The piece includes a small bowl, ideal for dipping sauces, which held some garlic butter for our bread.


Photos by moi.

Friday, September 17, 2010

Dutch Ovens


I have a confession. When Flannel Man and I got married I registered for one of Martha Stewart's dutch ovens at Macy's. I thought it was gorgeous, a deep blue color, coated with a heavy enamel, just perfect.

Perfect for what though? I haven't actually cooked a single thing in it! I'm at a complete loss of what to use it for, so I haven't actually cooked anything in it yet. Flannel Man is currently using it to store his secret stash of jolly ranchers, but I'm pretty sure that's not its intended purpose.

I found this site, which is full of dutch over recipes and I'm hoping to try one this week. Let me know if you guys have any great tips for dutch oven recipes.